Create Python Project from Scratch

Author
Affiliation

Jeremy Mikecz

Research Faciliation, Dartmouth Libraries

Published

January 13, 2026

Create a Python Project from Scratch with Visual Studio Code & UV

This document provides detailed instructions for setting up your Python environment for this course/workshop. You should have already read the information in the 00_setup_slides and completed the installation of Visual Studio Code and Python using uv by following Setup Notebook 01.

These coding notebooks and other materials are stored in the python-setup repository in Dartmouth Libraries Github.

TipBrief Cheatsheet

the brief, no-explanation-needed version:

  1. Set up a sample project folder, i.e. ~/Users/your-user-name/Documents/python_code/sample_project

  2. Open VSC and set up a link to this project folder, by selecting File –> Open Folder and open the folder you created above.

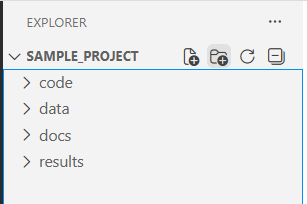
  3. In Explorers pane, create the following subfolders in your project folder: code, data, docs, results.

  4. Create a README.md file with important explanatory information about your project. Use markdown syntax to format the text.

  5. Set up a virtual environment for your project

    1. Terminal (Mac/Linux or Windows Command): uv --version

    2. Create virtual environment: uv init

  6. Create a Python script in your code folder, giving it the extension: .py.

  7. Select the Python Interpreter you want to use for this project by opening the “Show and Run Command Bars” (Windows: CTRL + SHIFT + P; Mac: CMD + CTRL + SPACE), select Python: Select Interpreter, and choose the version of Python installed to your local environment. I.e.: `Python 3.14.2 (name-of-project) .venv/Scripts/python.exe Recommended”

  8. Confirm uv is using the correct environment and Python:

    1. Windows: uv run where.exe python # first response should be your local Python
    2. Mac: uv run which python
    3. Note: compare to the results if you run these commands without uv run. You can also check by comparing the results of uv run python --version and python --version.
  9. Write code (see Step 4 above for an example script) and save your script.

  10. Run your script with uv run code/script-name.py or by pressing the “Play” button.

  11. To run code requiring external packages:

    1. install packages with uv add package_name.

    2. when needed, import a package with the code import package_name placed at the top of the document.

  12. To create a Jupyter notebook:

    1. install Jupyter via the Terminal with uv add jupyter.

    2. Create a new Jupyter notebook in your codefolder (with the extension .ipynb).

    3. select your Python environment: top-right corner –> Select Kernel –> Choose “Python Environments” –> select the one that says .venv or uv.

1. Setup Project in Visual Studio Code

1a. Set up sample project folder

  1. Create a new folder for your sample project in a place which you can easily find again. Follow recommended file naming projects (outlined in 00_setup_slides) such as using underscores _ in place of whitespace, avoiding special characters, etc. i.e.:
~/Users/your-user-name/Documents/python_code/sample_project

1b. Open Project Folder in Visual Studio Code

Visual Studio Code and other IDEs allow you to load an entire project at once. Thus, you can easily switch between projects and when you return to a given project all the same files that were open before are opened once again. Below, we will open our sample project folder and modify it.

  1. Open Visual Studio Code, which you installed with notebook 01.

  2. Click on File –> Open Folder. Navigate to your new project folder and open it.

  3. In the left pane of VSC, click on the Explorer icon (looks like pages or files) and you will see your empty folder there.

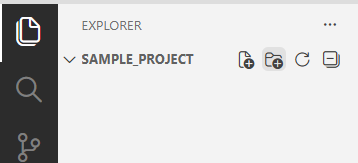
  4. Add the following folders using the **+ Folder icon **:

|--code
|--data
|--docs
|--results

screenshot of sample folder as seen in VSC after setting up code, data, docs, and results folders.

2. Setting Up a Python Virtual Environment for your project

As noted in the opening slides presentation: “A virtual environment keeps each project’s packages separate and organized, preventing conflicts and making your code easy to share.”

We will now use uv to create a virtual environment for our sample project.

2a. Open the command line in VSC

  1. Select the Terminal tab at the top of VSC –> New Terminal
  2. A new terminal should appear at the bottom.
  3. If you are using a PC, it is recommended you use a Command Prompt terminal instead of Powershell. To open Command, select the + symbol at the far right side of the terminal pane, and select Command Prompt.

2b. Confirm VSC can find your Python and uv installations

  1. In the terminal, you can test to see if VSC can find your Python and uv installations (just as we did in notebook 01) by running the following code:
uv --version
uv python list

2c. Create Virtual Environment

Make sure you are in the project root folder, i.e. your terminal should look like something like this (with a path to your project directory shown):

If you are not in the project root directory you can navigate to it by using the cd (change directory) command. Some tips:

  1. to navigate up one directory type cd ..
  2. to navigate up 3 directories type cd ../../..
  3. to navigate from the current working directory into your code folder type cd code.
  4. to navigate down two directories, type something like this: cd code/scripts (assuming the code folder is in your current working directory and a scripts folder is inside of that).

Now, run the following in your project’s root directory from the terminal:

# This initiaties a new uv environment for your project
uv init

You will see in the Explorer pane on the left side of VSC several new files and folders were created in your project’s working directory. The above command:

  • Installed Python if the correct version isn’t available

  • Created a pyproject.toml file, where uv will store information about the packages / dependencies used in this project.

  • Created a .python-version file to store the version of Python used for this project.

2d. Install / add packages to virtual environment

Initiating uv may also create a uv.lock file and a '.venv folder if you have already installed some packages. Let’s test this out by installing a package to our local environment at which point this file and folder will be created:

Run in the terminal:

uv add requests

Certainly, now you should see the following in your project’s root directory:

  • a uv.lock file which may be used by others (or by yourself in a different environment) to reproduce the exact same computing environment for your project.

  • a .venv folder where the code for all projects added to the local environment are stored

You can also install / add multiple packages at once:

uv add numpy pandas rich

You can use uv remove to uninstall packages. We really didn’t need requests. Let’s uninstall it:

uv remove requests

You can review what packages have been installed in multiple ways. You can open either the pyproject.toml or the uv.lock file. Or you can run the following in the terminal:

uv pip list

You should see something like this:

Package         Version
--------------- -----------
markdown-it-py  4.0.0
mdurl           0.1.2
numpy           2.4.1
pandas          2.3.3
pygments        2.19.2
python-dateutil 2.9.0.post0
pytz            2025.2
rich            14.2.0
six             1.17.0
tzdata          2025.3

*Note: the .toml file and uv pip list return all packages installed including dependencies. For example, when we installed rich, UV also installed the packages rich depends on: markdown-it-py, mdurl, and pygments. In contrast, the uv.lock just lists the actual packages that you, the user, installed:

dependencies = [
    "numpy>=2.4.1",
    "pandas>=2.3.3",
    "rich>=14.2.0",
]

This is because uv.lock serves as instructions for the re-creation of this environment on another computer. If you were to open this project on a different computer, you would run the command uv sync, which would recreate your environment by installing the specific versions of numpy, pandas, and rich you have installed on your machine. When those are installed, their dependencies will be automatically installed as well.

Now, try running this:

pip list

Notice any difference from the results returned by uv pip list? In my case this second command returned many, many more packages. Why? It’s because the uv command automatically retrieves the names of packages installed to the local virtual environment, whereas pip retrieves all packages installed. That is why, under the pip system, you need to activate your virtual environment with .venv/Scripts/activate (Windows) or .venv/bin/activate (Macs) every time you open a project. Fortunately, with uv, we are automatically using the virtual environment whenever we call uv within a project that has one.
2e. Set up the Python Interpreter

One final step: every time we start a new project in VSC we need to configure VSC to use the correct version of Python. We can do this by selecting our Python interpreter:

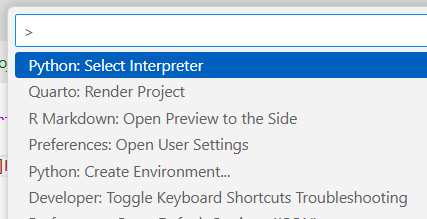
  1. Open the “Show and Run Command Bars” (either select from central dropdown project menu at top of screen or by clicking CTRL + SHIFT + P on Windows or CMD + CTRL + SPACE on a Mac)

  2. Search for and select Python: Select Interpreter

    Select “Python: Select Interpreter” from Show and Run Command Bars
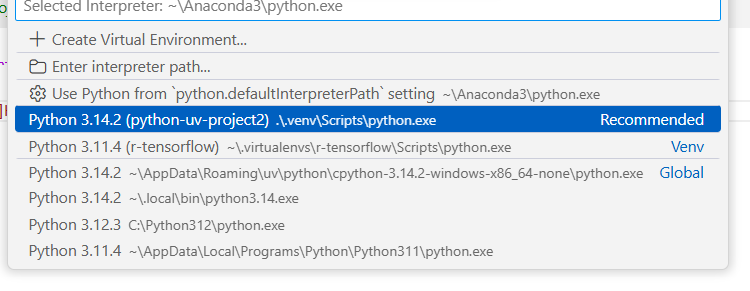
  3. Choose the version of Python installed to your local environment. It should look something like this: `Python 3.14.2 (name-of-project) .venv/Scripts/python.exe Recommended”

    Select the version of Python found within your local project environment

Let’s view which version of Python is being used by this project. Run the following in the terminal:

uv run python --version

VS Code Setup Checklist

 ✅ Install VS Code
 ✅ Install Python extension (ms-python.python)
 ✅ Install Jupyter extension
 ✅ Open project folder
 ✅ Select interpreter: Ctrl+Shift+P → "Python: Select Interpreter" → .venv
 ✅ Configure terminal to use uv

3. Write your first markdown document

A markdown file is a text file that allows you to use simple symbols to specify its formatting. This notebook and the 00_setup_slides presentation were both created using markdown.

Some commonly used symbols:

# Header level 1 (note '#' should be the first symbol on the line and followed by a single whitespace)
## Header level 2
### Header level 3
**bold**
*italics*
[filename](link/to/file)   # to create hyperlinks
```
place code blocks between sets of 3 back ticks
```

In the Explorer pane on the left, create a new file using the + File icon and name it README.md (.md is the extension for a markdown file).

Create a skeletal outline of a README file using headers of different levels, bold, italics, links, and code blocks (see the symbol directory above or the Markdown Guide’s Cheat Sheet for more examples of Markdown syntax). Include the following information:

  1. tentative name of your project
  2. name(s) of author(s) (you!)
  3. Overview section
  4. Data section
  5. Methods section

Save the file.

4. Write your first Python script

  1. Create a Python script in your code/ folder and name it something like this: greeting.py.
    1. Create a new script either by navigating to the code/ folder, right-clicking it, and selecting New File. Be sure to give the file the .py extension.

    2. OR File –> New File and then give your file a name and place it in the code folder.

      *Note: using the correct extension is essential so the computer knows how to read it. A .py file is a plain text file containing Python code that can be run with software like VSC or from the command line.*

  2. Type / paste in the following code (modifying it to make it your own) in the Python script:
# Get the user's name
name = input("What's your name? ")

# print(name, "is a beautiful name.")
  1. Save the script (important: when you run a script it will only run the most recently saved version).
  2. Run your script in the terminal using uv:
uv run code/greeting.py
  1. Other options to run this file:

    1. Right-click anywhere within greeting.py (in VSC) and select Run Python –> Run Python File in Terminal

    2. You can also run the script by selecting the Play icon button at the top of the editor window where you have greeting.py. Note: with this method, you are NOT using uv to run the script. Therefore, VSC may not know which Python version on your computer to run or it may choose a version that doesn’t work. If you get an error: choose the version that looks something like this: Python 3.XX.X (sample-project) .\.venv\Scripts\python.exe Workspace.

Optional additions to script:

add to your Python script:

# Get their favorite color
color = input("What's your favorite color? ")

# Respond based on their color choice
if color.lower() == "blue":
    print(f"Hello, {name}! Blue is a calm and peaceful color. Great choice!")
elif color.lower() == "red":
    print(f"Hello, {name}! Red is bold and energetic. I like it!")
elif color.lower() == "green":
    print(f"Hello, {name}! Green is the color of nature. Very refreshing!")
else:
    print(f"Hello, {name}! {color.title()} is a wonderful color!")

4b. Create a Script Requiring External Code from a Python Package

You can only do a few simple things with core Python code. Anything more complex - from data analysis to statistics, working with images and text, etc. - you will need to:

  1. install the package to your local environment using uv (do this once per project)
  2. import the package into any scripts or notebooks that use it (must include in each code script or notebook)

We will create a random compliments generator in a Python script, which requires the use of two packages:

  • random (which is part of the core Python installation and thus DOES NOT need to be installed, but DOES need to be imported) and

  • rich (which DOES NEED to be installed AND imported).

To install rich run the following in the terminal:

uv add rich 

You can confirm the installation of this package to your local environment in multiple ways.

  1. Open the pyproject.toml file and you should see it listed among the dependencies.
  2. Open uv.lock and you can see information about the installed rich package.
  3. Review code files for the rich package stored in .venv/Lib/site-packages.
  4. Type uv pip list or uv pip freeze in the command line / terminal.

NOTE: Never manually modify any of the above unless you know what you are doing. These files and folders are manually updated by uv when you run uv commands.

Then paste / type the following into a new Python script called compliment_generator.py.

import random
from rich import print

# List of compliments
compliments = [
    "You're doing an amazing job learning Python! 🎉",  # \U0001F389
    "Your curiosity is inspiring! 🌟",                  # \U00002B50
    "You have great potential as a programmer! 💻",
    "Keep up the excellent work! 🚀",                   # \U0001F680"
    "You're braver than you think for trying something new! 💪"
    "✨"
]

# Get user's name
name = input("What's your name? ")

# Pick a random compliment
chosen_compliment = random.choice(compliments)

# Print with color using rich
print(f"\n[bold cyan]Hey {name}![/bold cyan]")
print(f"[green]{chosen_compliment}[/green]\n")

Note: to acquire these and other emojis:

  1. on a PC press Windows + . or Windows + ;
  2. On a Mac type Command + Control + Space.
  3. On a Linux type Ctrl + . or Ctrl + ;.

Try running this script from the command line using the same procedure introduced in the previous step.

5. Write your first Jupyter Notebook

Coding notebooks allow a user to create a more interactive, modular code script. These notebooks allow users to mix markdown texts (with human-readable instructions and explanations) with code cells, which can be run one at a time or all at once. They also allow users to view various intermediary results (i.e. data tables or visualizations) right within their notebook.

Jupyter is the most commonly used type of coding notebook for Python.

5a. Install Jupyter

  1. To use Jupyter first we need to install it using uv. Run the following in the terminal:
uv add jupyter

5b. Create a New Notebook

  1. Right-click in the Explorer sidebar (where your files are)

  2. Click “New File”

  3. Name it: my_first_notebook.ipynb

  • The .ipynb extension is important!
  1. Press Enter

5c. Select Your Python Environment

  1. When the notebook opens, look at the top-right corner

  2. Click “Select Kernel”

  3. Choose “Python Environments…”

  4. Select the one that says .venv or uv

5d. Start Coding

  1. Click in the first cell

  2. Type some Python code

  3. Press Shift + Enter to run the cell

  4. That’s it! 🎉

5e. Fun Practice Notebook Contents

A short cheatsheet for working with Jupyter notebooks (or click here for a more extensive cheatsheet:

╔══════════════════════════════════════════════╗
║      JUPYTER NOTEBOOK SHORTCUTS              ║
╠══════════════════════════════════════════════╣
║                                              ║
║  RUN CELL:                                   ║
║  • Shift + Enter  (run and move to next)     ║
║  • Ctrl + Enter   (run and stay)             ║
║                                              ║
║  ADD CELLS:                                  ║
║  • Click "+ Code" or "+ Markdown" buttons    ║
║  • Or use the + icon at top                  ║
║                                              ║
║  CHANGE CELL TYPE:                           ║
║  • Use dropdown: "Code" or "Markdown"        ║
║                                              ║
║  DELETE CELL:                                ║
║  • Click trash icon on left of cell          ║
║                                              ║
║  SAVE NOTEBOOK:                              ║
║  • Ctrl + S (or Cmd + S on Mac)              ║
║                                              ║
║  RESTART KERNEL:                             ║
║  • Click "Restart" icon at top               ║
║  • Use when things get stuck                 ║
║                                              ║
╚══════════════════════════════════════════════╝

Copy and paste these cells into your notebook to practice:

📝 Cell 1: Markdown (Introduction)

Click the cell, then change it to “Markdown” using the dropdown at the top

# 🎉 My First Jupyter Notebook

Welcome to my coding adventure! Today I'm learning about Jupyter notebooks.

## What I'll practice:
- Running Python code in cells
- Using **markdown** for notes
- Making calculations
- Creating simple visualizations
---

**Date:** January 2025  
**Mood:** Excited! 🚀

Cell 2: Code (Simple Math)

# Let's do some calculations!
print("🧮 Quick Math Practice")
print("-" * 30)

my_age = 25  # Change this to your age!
python_age = 2025 - 1991  # Python was created in 1991

print(f"I am {my_age} years old")
print(f"Python is {python_age} years old")
print(f"Python is {python_age - my_age} years older than me!")
🧮 Quick Math Practice
------------------------------
I am 25 years old
Python is 34 years old
Python is 9 years older than me!

📝 Cell 3: Markdown (Observations)

## 💭 My Observations

The cool thing about notebooks is that I can:
1. Write code
2. See the results immediately
3. Add notes about what I learned

> **Tip:** Press `Shift + Enter` to run a cell!

5f. Create a basic visualization

Let’s experiment by creating a data visualization using some popular Python packages.

  1. Create a new notebook and name it plotting_penguins.ipynb or something like that.
  2. Next, we need to install the following Python libraries / packages:
    • pandas - for working with data tables

    • matplotlib - for creating data visualizations

    • seaborn - some additional functionality and assistance working with matplotlib

To install these, we will use uv in the terminal:

uv add pandas matplotlib seaborn

Note: we can install multiple packages at once using this syntax.

  1. In the first code cell in the new notebook, let’s install the necessary packages:
import seaborn as sns
import matplotlib.pyplot as plt
  1. Next, we can import a preloaded dataset from seaborn and preview its data:
# Load a built-in dataset (no files needed!)
penguins = sns.load_dataset('penguins')

# Take a quick look at the data
print("🐧 Palmer Penguins Dataset")
print("=" * 50)
print(penguins.head())
print(f"\nTotal penguins: {len(penguins)}")
print(f"Species: {penguins['species'].unique()}")
🐧 Palmer Penguins Dataset
==================================================
  species     island  bill_length_mm  bill_depth_mm  flipper_length_mm  \
0  Adelie  Torgersen            39.1           18.7              181.0   
1  Adelie  Torgersen            39.5           17.4              186.0   
2  Adelie  Torgersen            40.3           18.0              195.0   
3  Adelie  Torgersen             NaN            NaN                NaN   
4  Adelie  Torgersen            36.7           19.3              193.0   

   body_mass_g     sex  
0       3750.0    Male  
1       3800.0  Female  
2       3250.0  Female  
3          NaN     NaN  
4       3450.0  Female  

Total penguins: 344
Species: ['Adelie' 'Chinstrap' 'Gentoo']
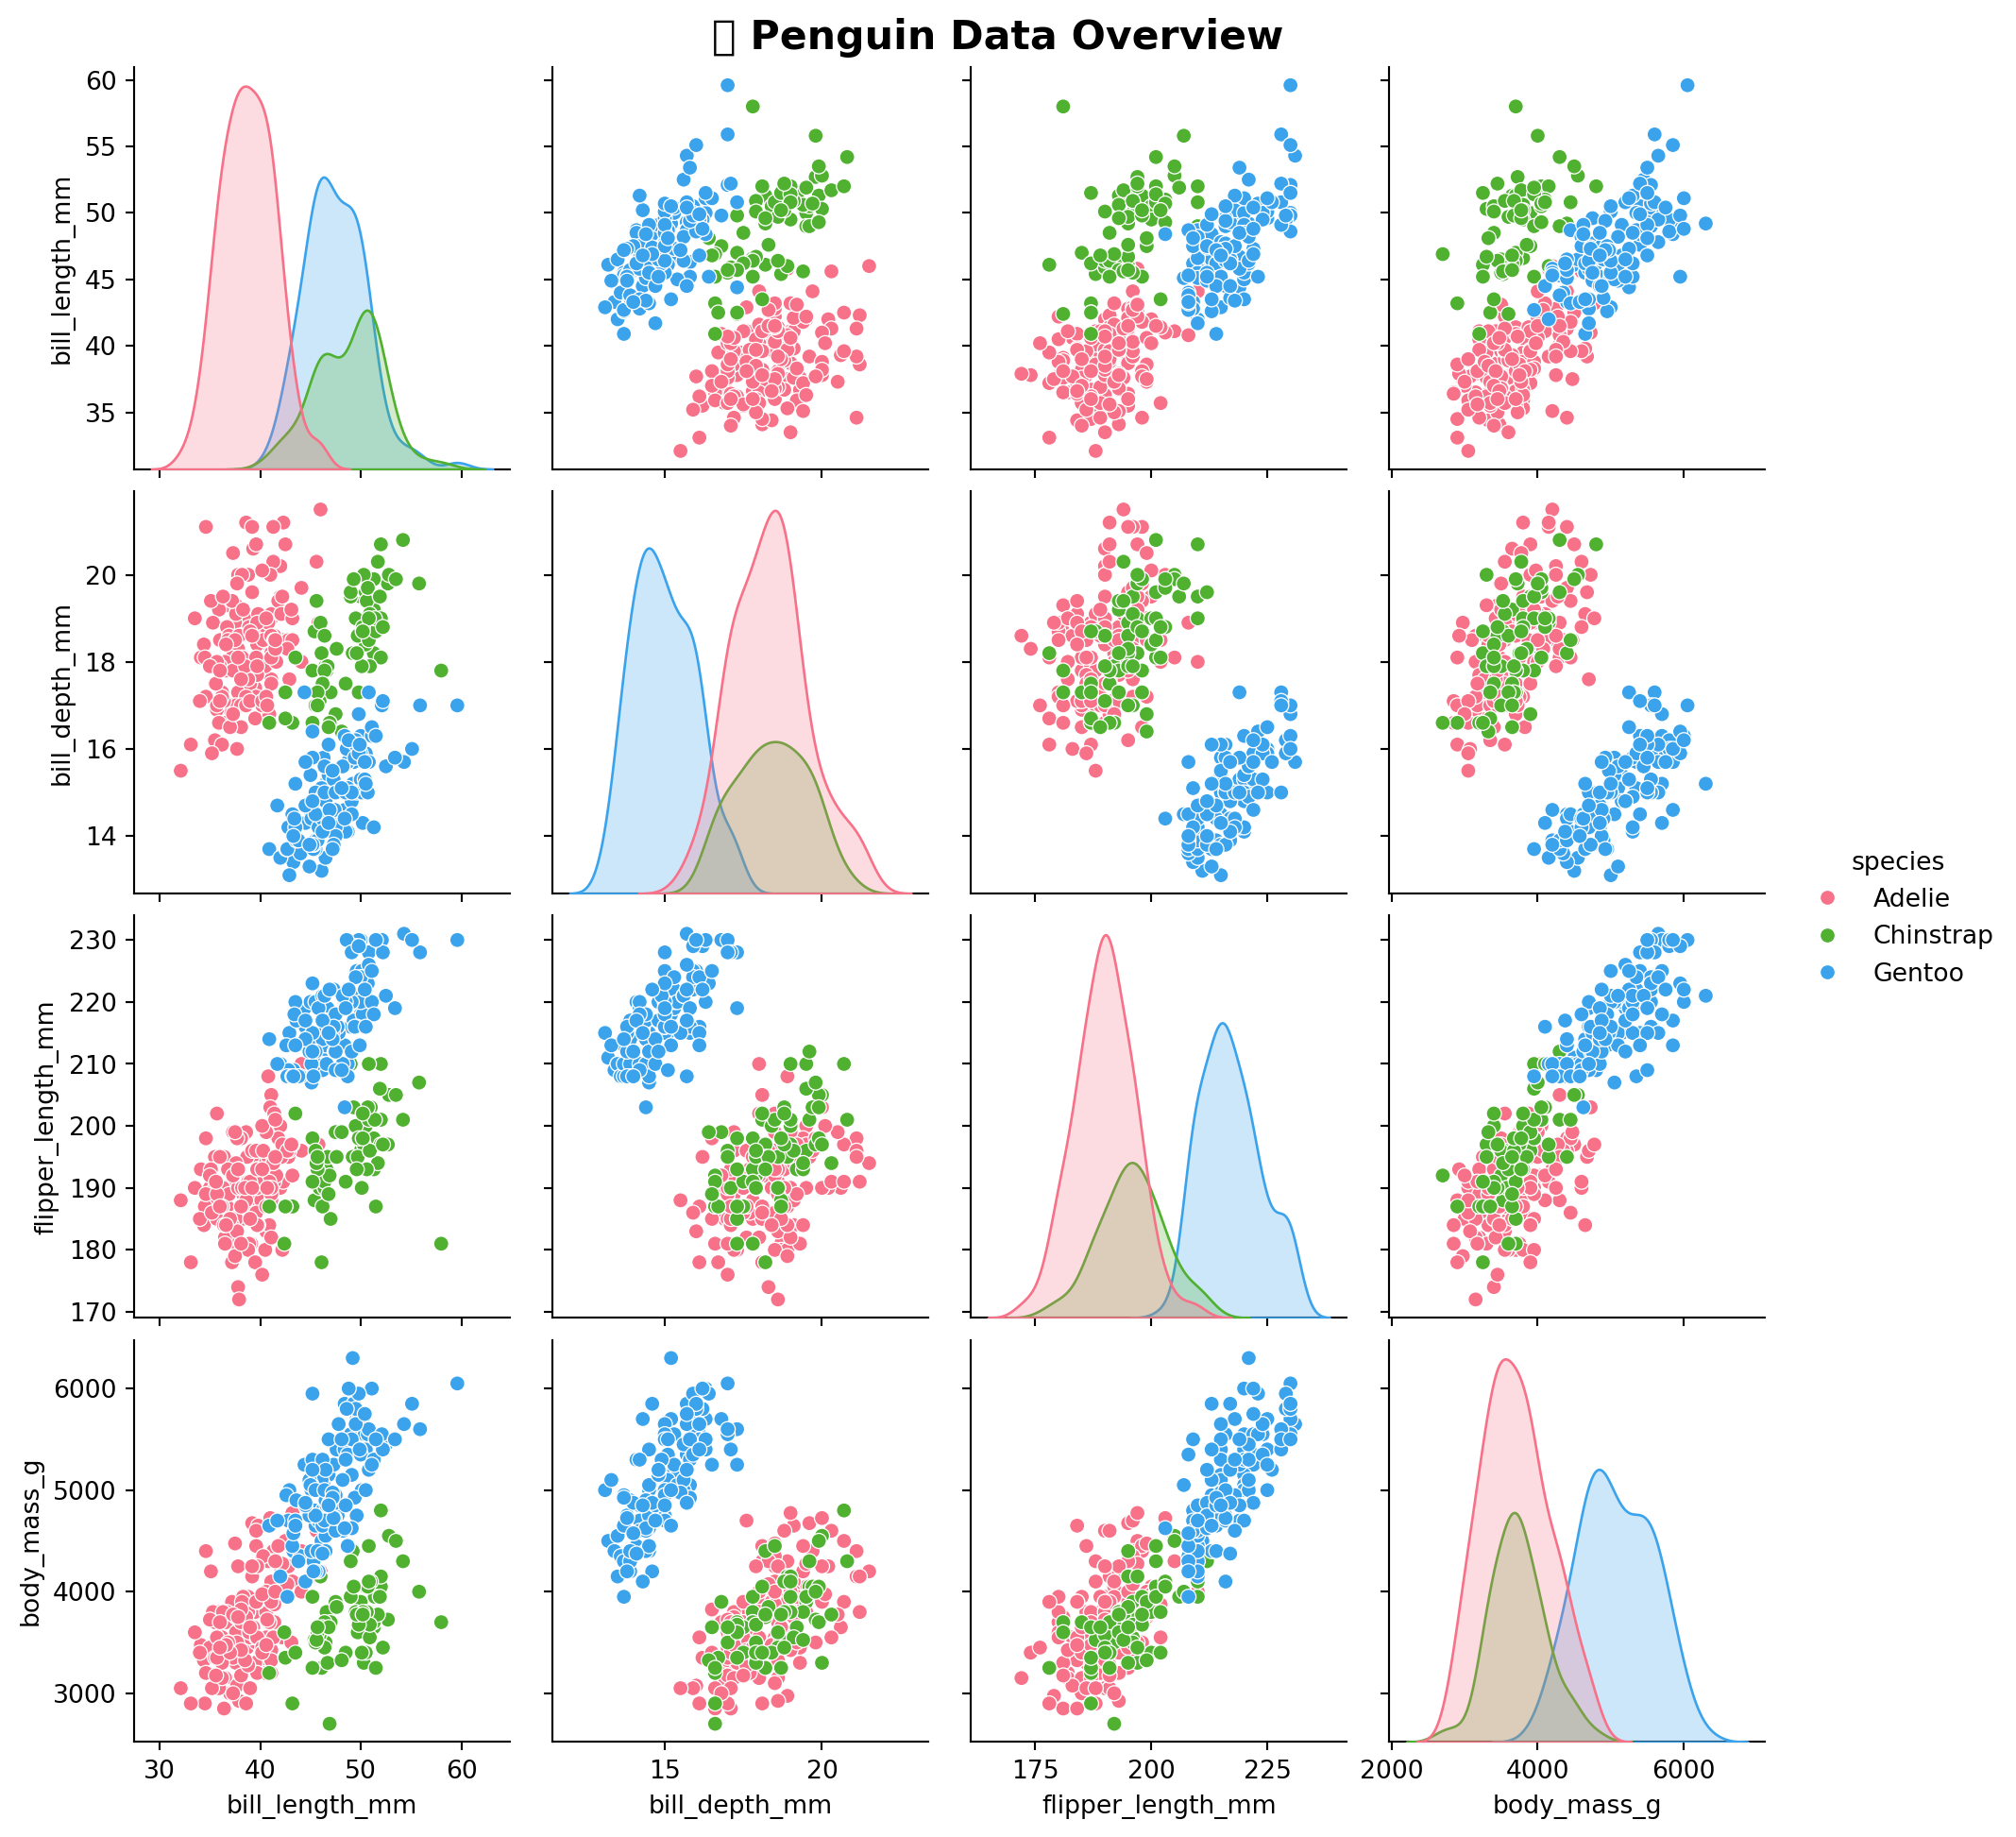
  1. Now, let’s create a pair plot of this data:
# Create visualization in ONE line!
sns.pairplot(penguins, hue='species', palette='husl')

plt.suptitle('🐧 Penguin Data Overview', y=1.01, fontsize=16, fontweight='bold')
plt.show()
C:\Users\F0040RP\AppData\Roaming\Python\Python312\site-packages\IPython\core\pylabtools.py:170: UserWarning: Glyph 128039 (\N{PENGUIN}) missing from font(s) DejaVu Sans.
  fig.canvas.print_figure(bytes_io, **kw)

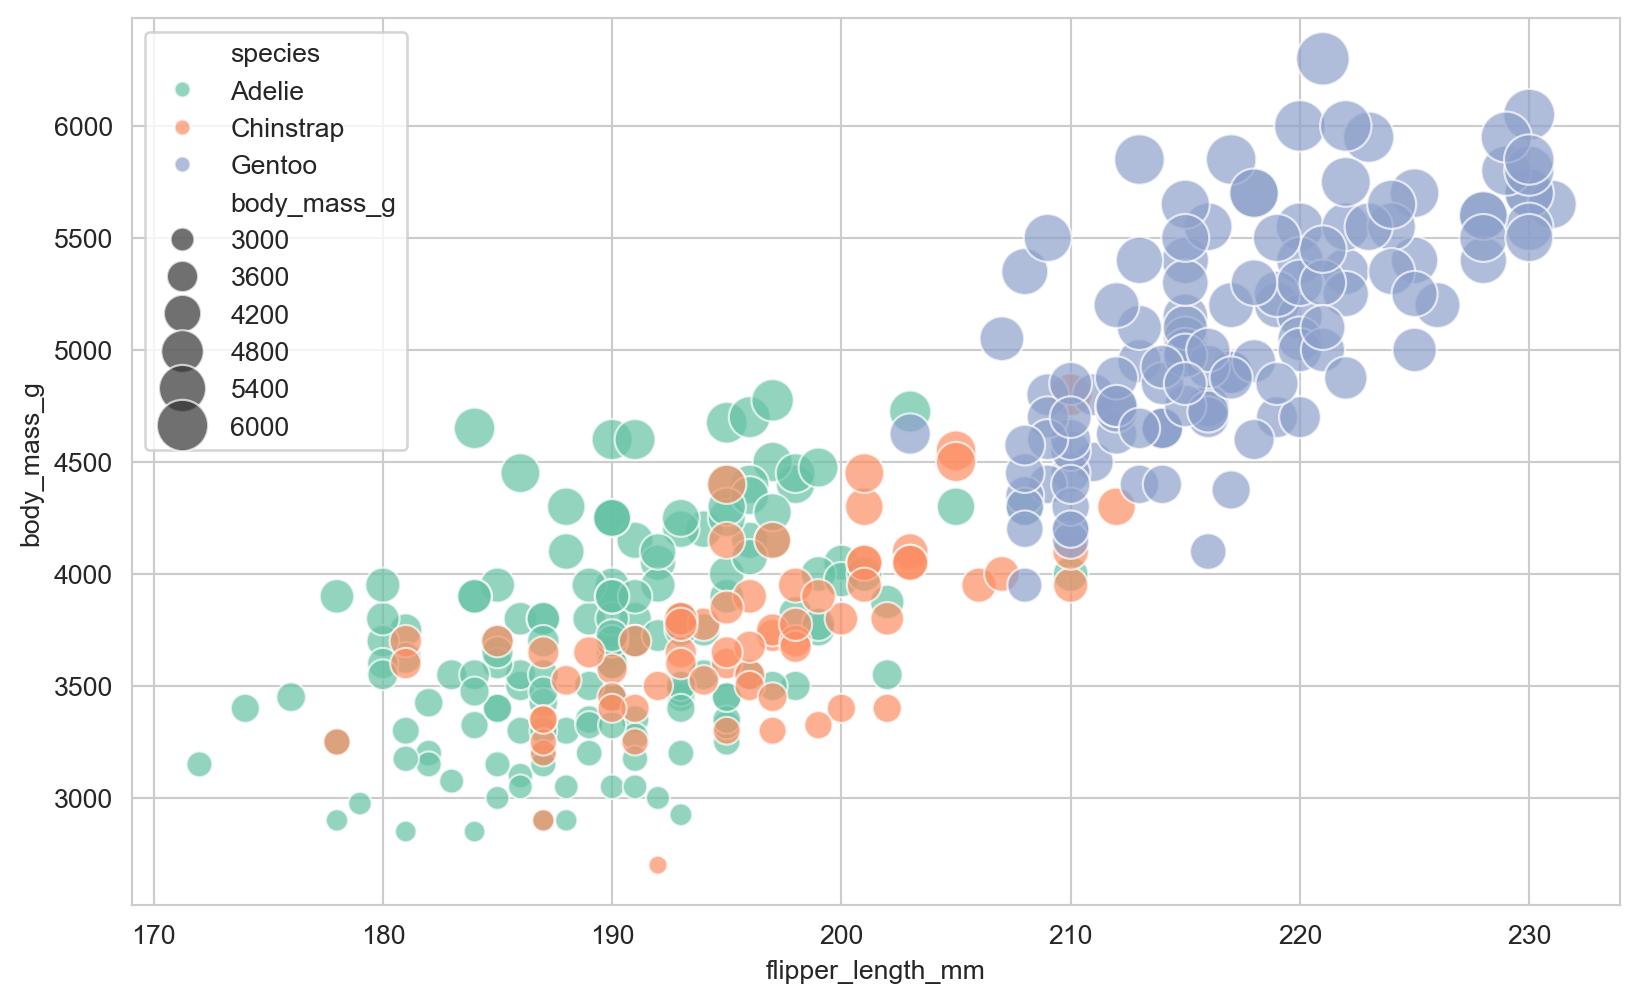
Or, we can create a scatterplot with additional customization:

# Create a colorful visualization
sns.set_style("whitegrid")
plt.figure(figsize=(10, 6))

# Scatter plot: flipper length vs body mass, colored by species
sns.scatterplot(
    data=penguins,
    x='flipper_length_mm',
    y='body_mass_g',
    hue='species',
    size='body_mass_g',
    sizes=(50, 400),
    alpha=0.7,
    palette='Set2'
)

Troubleshooting Section

Problem 1: “Select Kernel” Button Missing

Solution:

  • Make sure you saved the file with .ipynb extension

  • Close and reopen the file

  • Install the Jupyter extension: Click Extensions (sidebar) → search “Jupyter” → Install

Problem 2: Kernel Won’t Start

Solution:

  • Open Terminal and run: uv add ipykernel

  • Reload VS Code: Press Ctrl+Shift+P, type “Reload Window”, press Enter

  • Try selecting the kernel again

Problem 3: Code Cell Won’t Run

Symptoms: Nothing happens when you press Shift+Enter

Solution:

  • Check if kernel is connected (top-right should show Python version)

  • Click the kernel name and select it again

  • Restart kernel: Click “Restart” icon at the top

Problem 4: Matplotlib Charts Don’t Show

Solution:

  • Make sure you ran the installation cell (Cell 6)

  • Add this line before your plotting code:

    %matplotlib inline
    Restart the kernel and run all cells again

Problem 5: Input() Not Working

Symptoms: Input prompt doesn’t appear or freezes

Solution:

This is normal in Jupyter! Look for the input box at the TOP of the cell output
Make sure you're running the cell (not just clicking it)
If stuck, click "Interrupt" button at top, then try again

Problem 6: Can’t Install Packages

Error: “uv: command not found” or similar

Solution:

Use pip instead:

::: {#678fb6a0 .cell execution_count=7}
``` {.python .cell-code}
pip install matplotlib
```

::: {.cell-output .cell-output-stdout}
```
Requirement already satisfied: matplotlib in c:\python312\lib\site-packages (3.10.3)Note: you may need to restart the kernel to use updated packages.

Requirement already satisfied: contourpy>=1.0.1 in c:\python312\lib\site-packages (from matplotlib) (1.3.2)
Requirement already satisfied: cycler>=0.10 in c:\python312\lib\site-packages (from matplotlib) (0.12.1)
Requirement already satisfied: fonttools>=4.22.0 in c:\python312\lib\site-packages (from matplotlib) (4.55.8)
Requirement already satisfied: kiwisolver>=1.3.1 in c:\python312\lib\site-packages (from matplotlib) (1.4.8)
Requirement already satisfied: numpy>=1.23 in c:\python312\lib\site-packages (from matplotlib) (1.26.4)
Requirement already satisfied: packaging>=20.0 in c:\users\f0040rp\appdata\roaming\python\python312\site-packages (from matplotlib) (24.0)
Requirement already satisfied: pillow>=8 in c:\python312\lib\site-packages (from matplotlib) (11.1.0)
Requirement already satisfied: pyparsing>=2.3.1 in c:\python312\lib\site-packages (from matplotlib) (3.2.1)
Requirement already satisfied: python-dateutil>=2.7 in c:\python312\lib\site-packages (from matplotlib) (2.9.0.post0)
Requirement already satisfied: six>=1.5 in c:\python312\lib\site-packages (from python-dateutil>=2.7->matplotlib) (1.16.0)
```
:::

::: {.cell-output .cell-output-stderr}
```
WARNING: Ignoring invalid distribution ~ (C:\Python312\Lib\site-packages)
WARNING: Ignoring invalid distribution ~-p (C:\Python312\Lib\site-packages)
WARNING: Ignoring invalid distribution ~ip (C:\Python312\Lib\site-packages)
WARNING: Ignoring invalid distribution ~~p (C:\Python312\Lib\site-packages)
WARNING: Ignoring invalid distribution ~ (C:\Python312\Lib\site-packages)
WARNING: Ignoring invalid distribution ~-p (C:\Python312\Lib\site-packages)
WARNING: Ignoring invalid distribution ~ip (C:\Python312\Lib\site-packages)
WARNING: Ignoring invalid distribution ~~p (C:\Python312\Lib\site-packages)
WARNING: Ignoring invalid distribution ~ (C:\Python312\Lib\site-packages)
WARNING: Ignoring invalid distribution ~-p (C:\Python312\Lib\site-packages)
WARNING: Ignoring invalid distribution ~ip (C:\Python312\Lib\site-packages)
WARNING: Ignoring invalid distribution ~~p (C:\Python312\Lib\site-packages)
```
:::
:::

Problem 5: Input() Not Working

Symptoms: Input prompt doesn’t appear or freezes

Solution:

  • This is normal in Jupyter! Look for the input box at the TOP of the cell output

  • Make sure you’re running the cell (not just clicking it)

  • If stuck, click “Interrupt” button at top, then try again

Problem 6: Markdown Cell Shows Code Instead of Formatted Text

Solution:

  • Make sure the cell type is set to “Markdown” (check dropdown at top)

  • Run the cell with Shift+Enter to render it

  • If still showing code, change to Markdown and run again

Problem 7: Notebook is Slow or Unresponsive

Solution:

  • Restart the kernel: Click “Restart” icon at top

  • Clear all outputs: Click “…” menu → “Clear All Outputs”

  • Close other programs to free up memory

  • Save and reload VS Code